The Microsoft Application Virtualization Sequencer is used to create the virtual applications and application packages that are streamed from the App-V Management or Streaming Server to the App- Clients.
Microsoft Application Virtualization Sequencer (Requirements)


 9. At the Package Name screen, in the Virtual Application Package Name field, enter XMLNotepad then click Next.
 10. The Sequencer will now begin monitoring the system and launch the XMLNotepad.msi file for you. CLick Next to start the installer, click Next.


 19. At the Installation Report screen, click Next.

20. At the Customize screen, select Customize. Further configure the virtual application package and click Next.


 The Prepare for Streaming page lets you start the applications associated with the shortcuts Microsoft Application Virtualization created. This will determine the primary feature block, which contains the portion of the application required to launch the application on the Microsoft Application Virtualization Client.

25. The Sequencer will launch the XML Notepad application. In the Open dialog box, click Cancel.
26. In XML Notepad, click File | Exit to close Word Viewer.
27. Back in the Sequencer, click Next.
28. At the Target OS screen, make note of the available OS options that will determine which client OS the package will be allowed to stream to, make note that Windows 7 32-bit is selected by default, and click Next.

29. At the Create Package screen, select the Continue to modify package without saving using the package editor button and click Next.


Application will launch as above.
Microsoft Application Virtualization Sequencer (Requirements)
· Windows 7 Professional, Enterprise, or Ultimate (32-bit or 64-bit)
Preferably Virtual Machine
Install Microsoft Application Virtualization Sequencer
Do this on the computer used for Microsoft Application Virtualization Sequencer:
Important: The computer used for the Sequencer must contain only a fresh installation of the Windows operating system. Do not install Microsoft Application Virtualization Sequencer on a computer that hosts Microsoft Application Virtualization Management Server or Microsoft Application Virtualization Desktop Client.
Install the Sequencer
Install the Sequencer
1. Run the setup executable for Microsoft Application Virtualization Sequencer.
2. The setup wizard will scan for and prompt you to install Microsoft Visual C++ 2005 SP1 Redistributable Package.
3. In the InstallShield Wizard dialog box, click Install.
4. On the Welcome page, click Next.
5. Read and accept the licensing agreement, and then click Next.
6. At the CEIP screen, click Next.
7. Accept the default installation path, and then click Next.
8. At the Virtual Drive screen, ensure Q: is selected and click Next.

9. At the Ready to Install screen, click Install.
10. When the installation is complete, click Finish. Microsoft Application Virtualization Sequencer will start.
Note: You can now save a snapshot of the VM. This will enable you to reset the sequencing computer to a clean base state and have the operating system and the Sequencer installed after each package sequencing operation has been completed. If you are going to create a snapshot or create and image, FIRST ENSURE that the sequencer is not open.
Sequencing XML Notepad 2007
Sequencing XML Notepad 2007
This illustrates the basic sequencing process. You can use XML Notepad as a application that you can easily and quickly deploy using the Microsoft Application Virtualization platform.
Do this on the App-V Sequencer:
1. Copy XML Notepad 2007 source files to the desktop of the App-V Sequencer computer.
2. Create a directory on the Sequencer desktop called XMLNotepad. You will save the output of the Sequencer to this directory.
3. Click Start | All Programs | Microsoft Application Virtualization | Microsoft Application Virtualization Sequencer to open Microsoft Application Virtualization Sequencer on the Sequencer virtual machine as shown below.

4. Click Create a New Virtual Application Package. The Sequencing Wizard displays.

5. At the Package Method screen, select Create Package (default). Click Next.

6. At the Prepare Computer screen, the Sequencer will look for and report on any services that may be running that could potentially cause problems while sequencing.
If your Sequencer is recommending that you stop any processes on your machine, be sure to stop those processes now. Once the processes are stopped return to the Sequencer and click Refresh.
When the Sequencer displays “Your system is ready to create a virtual package, no issues were detected,” click Next to continue.

7. At the Type of Application screen, ensure Standard Application (default) is selected and Click Next.

8. At the Select Installer screen, ensure Select installer for the application is selected, click Browse then browse to the desktop and select the XMLNotepad.msi file. Then click Next.


11. Accept the terms of the XML Notepad 2007 license agreement, and then click Continue.

12. Click Browse, and select the Q:\XMLNotepad folder and click Next.

13. On the Install XML Notepad to page, click Install.

14. In the Installation is Complete dialog box, click Finish.

15. Back in the Sequencer, check the box labeled I am finished installing and click Next.

16. At the Configure Software screen, select XML Notepad and click Run Selected.
17. Word Viewer will open. Click Cancel and close Word Viewer.
18. Back in the sequencer on configure software page, click Next.
17. Word Viewer will open. Click Cancel and close Word Viewer.
18. Back in the sequencer on configure software page, click Next.


20. At the Customize screen, select Customize. Further configure the virtual application package and click Next.

21. At the Edit Shortcuts screen, in the left-hand pane, click Launch Internet Explorer and Readme File component, and then click Remove.
22. In the right-hand pane, click XML Notepad, and then click Edit.
22. In the right-hand pane, click XML Notepad, and then click Edit.

23. When you are done viewing this information, click Next.
24. On the Prepare for Streaming page, click XML Notepad 2007, and then click Run Selected.


25. The Sequencer will launch the XML Notepad application. In the Open dialog box, click Cancel.
26. In XML Notepad, click File | Exit to close Word Viewer.
27. Back in the Sequencer, click Next.
28. At the Target OS screen, make note of the available OS options that will determine which client OS the package will be allowed to stream to, make note that Windows 7 32-bit is selected by default, and click Next.

29. At the Create Package screen, select the Continue to modify package without saving using the package editor button and click Next.

30. At the Package Completed screen, click Close to close the wizard and return to the main Sequencer window.

31. Select the Deployment Tab. Set the following properties for the package:
a. Protocol: RTSP
b. Hostname: FQDN of Management Server
c. Path: XMLNotepad
d. Generate Microsoft Windows Installer (MSI) Package: Enabled
e. Compress Package: Enabled
f. Operating Systems: Check that the operating system selected is the same as that used on your client computer.

32. Click File | Save, and then browse in to the folder XMLNotepad that you created on the desktop and save your work as XMLNotepad in the File Name field then click Save.
33. Close the Sequencer.
34. Copy the XMLNotepad folder to the content share on the App-V Management Server.
Publish the Application
Import the newly sequenced application on the App-V Management Server and publish it to the client computer.
Do this on the App-V Management Server:
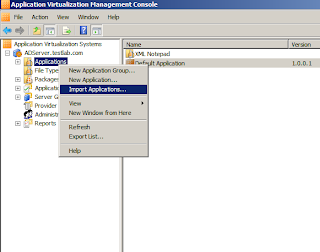
1. In Administrative Tools, click Application Virtualization Management Console.
2. In the console tree, expand the server node, and then click Applications.
3. Right-click Applications and then click Import Applications….

4. Navigate to \\<server name>\content, and open the XMLNotepad folder.


5. Click the XMLNotepad.sprj file, and click Open. The New Application Wizard will launch.
6. On the General Information page, verify that values for the OSD Path and Icon Path are in UNC format (for example, \\server\content\XMLNotepad\XMLNotepad.osd) and that the Enabled check box is selected.
7. Click Next.

8. On the Published Shortcuts page, select the appropriate shortcut location checkboxes and click Next.


8. On the Published Shortcuts page, select the appropriate shortcut location checkboxes and click Next.

9. On the File Associations page, click Next.


10. On the Access Permissions page, click Add.


11. In the Add/Edit User Group dialog, navigate to the appropriate user group to access the application (App-V Users) and click OK.
12. Click Next.
13. On the Summary page, review the configuration information and click Finish.
Stream the Application
Do this on the App-V Client:
To access the newly published application, log off of the Microsoft Application Virtualization Desktop Client computer and log on as a member of the user group to which the application is assigned. The application will now be available to clients at the designated shortcut locations.
To access the newly published application, log off of the Microsoft Application Virtualization Desktop Client computer and log on as a member of the user group to which the application is assigned. The application will now be available to clients at the designated shortcut locations.


Application will launch as above.


No comments:
Post a Comment